Windwalker Monk PvE Guide
This guide is designed to be the full guide for Windwalker with all the information you need. For more in-depth, advanced information follow the links to those pages in the "Further Reading" sections or in the "Advanced" section in the menu above.
This guide has been updated for Midnight Patch 12.1 and is regularly updated when discussion, theorycrafting, or testing yields new information.
Talent Builds
There is a lot of flexibility with talents, so if you prefer a different setup or like to change a talent here or there then you can likely do that without dramatically lowering your damage. It's a game, play what you'd like.
- Class Tree
- Raid
- Mythic+
- Delves
- Flowchart
- Omnium Folio
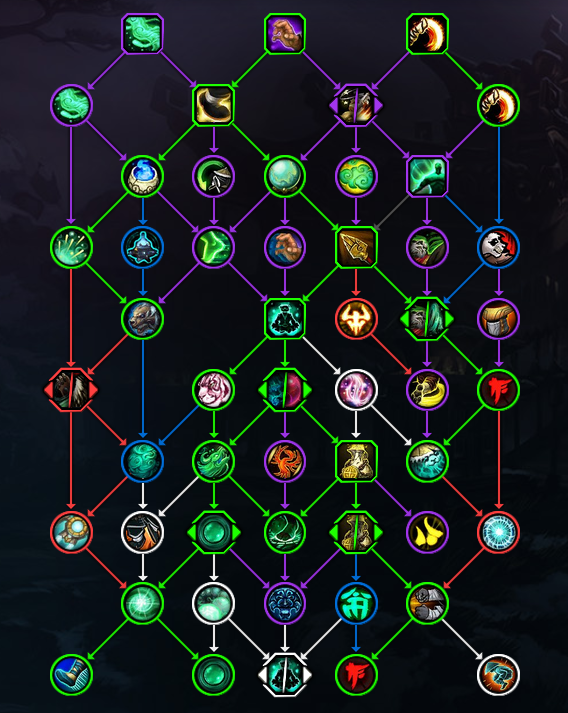
There is a lot of flexibility in what you can pick in the Monk Class Tree.
- Green = Always Pick
- Blue = Pick as very strong default optional Talents
- Purple = Pick based on your demands in the content of your Choice
- White = Pick for very situational Niche Situations
- Red = Never Pick
Shado-Pan is generally recommended due to simplicity, Conduit of the Celestials can be stronger at the highest levels of play.
Shado-Pan
Pure Single Target Import: C0QAAAAAAAAAAAAAAAAAAAAAAMzYw2MmhlZGbzAAAAAAAAAAAAsMMaGzwwAmxwMzMDz2wMMLzEAwiZ2mZYmZmBAwGAMLzSzMzsAgBmZAglBiB8B
Two Target Import: C0QAAAAAAAAAAAAAAAAAAAAAAMzYAjxYbmZ2mBAAAAAAAAAAAYZY0MmhhBMjhZmZGmNmZYWmJAgFmtxMmZmZAAsBAzys0MzMLAGDMzAALDEDYA
Cleave Import: C0QAAAAAAAAAAAAAAAAAAAAAAMzYw2wMsNzYbGAAAAAAAAAAAglhRzYGGGwMGmZmZY2YmhZZmAAWMz2MzYMzMAA2AgZZWamZmFAMwMDAsMQMgB
Conduit of the Celestials
Pure Single Target Import: C0QAAAAAAAAAAAAAAAAAAAAAAMzYM2GmhlZmZbGAAAAAAAAAAAglhRzYGGGwMGmZmZY2GmhZZmAAWMz2MzYmZmBAwiZWmlxEEAAGAzAwyAxMzs5BA
Two Target Import: C0QAAAAAAAAAAAAAAAAAAAAAAMzYMgxYbmZ2mxAAAAAAAAAAAALDjmxMMMgZMMzMzwsxMDzyMBAsYmtxMmZmZAAsYmlZZMBBAMjBwMAsMQMzMbeA
Boss with Adds Import: C0QAAAAAAAAAAAAAAAAAAAAAAMzYM2GGjlZmZbGAAAAAAAAAAAglhRzYGGGwMGmZmZY2GmhZZmAAWMz2MzYMzMAAWMzysMmgAAMGAzAwyAxMzs5BA
Note: Decision between Restore Balance and Xuen's Bond is entirely down to the on use trinket you currently use. If you play a 2 min trinket default to Restore Balance, if you play a 90 second trinket default to Xuen's Bond. Playing double passive trinkets allows you to talent into any of those two, depending on the situation one may be more useful than the other.
Conduit should be better in Mythic+, but is also more difficult. You may be better off playing Shado-Pan.
Shado-Pan
Default Import: C0QAAAAAAAAAAAAAAAAAAAAAAMzYAMGbzMz2MAAAAAAAAAAAALDzEmxywAmxwMzMDz2wMMLzEAwiZ2mZGzMzMAA2AgZZWamZmFAMwMDAswQMgB
Conduit of the Celestials
Default Import: C0QAAAAAAAAAAAAAAAAAAAAAAMzYMgxYZmx2MAAAAAAAAAAAALDzEmhhBMjhZmZGmthZYWmJAgFmtxMmZmZAAsYmlZZMBBAMjBwMAjlBiZmZzA
Note: Decision between Restore Balance and Xuen's Bond is entirely down to the on use trinket you currently use. If you play a 2 min trinket default to Restore Balance, if you play a 90 second trinket default to Xuen's Bond. Playing double passive trinkets allows you to talent into any of those two, depending on the situation one may be more useful than the other.
Shado-Pan is generally recommended due to strength and ease. Both Hero Talents are viable and can be played.
Shado-Pan
Default Import: C0QAAAAAAAAAAAAAAAAAAAAAAMzYAMGbzMz2MAAAAAAAAAAAALDzEmxywAmxwMzMDz2wMMLzEAwiZ2mZGzMzMAA2AgZZWamZmFAMwMDAswQMgB
Conduit of the Celestials
Default Import: C0QAAAAAAAAAAAAAAAAAAAAAAMzYMgxYZmZ2mBAAAAAAAAAAAYZY0MmBMgZMMzMzwsNMDzyMBAswsxMmZmZAAsYmlZZMBBAMjBwMAjlBiZmZzA

Omnium Folio
- 1st Row
- 2nd Row
- Rune of Self-Mending if you want pseudo-Leech
- (Default) Rune of Void-Tainted Shell
- Rune of Lynxlike Reflexes if you are racing
- 3rd Row
- 4th Row
- (Default) Rune of Critical Power - stacking Crit is generally more useful
- Rune of Burning Haste or Rune of Masterful Cunning if they sim better
- 5th Row
The 4th and 5th Rows are best simmed for your character as there may be variations.
Abilities
Instructions
Windwalkers generally prioritize our abilities by how much damage they do and the resources (Chi, energy, execution time) that they cost. There are a couple of general goals while playing Windwalker that should help with the bigger picture before diving into the priority lists below:
- Manage Energy and Chi - Outside of big Haste cooldowns, Windwalker's damage is restricted by how many resources we can generate and spend. This means that sitting at the Energy cap or generating more Chi than you have space for typically results in lost damage potential. Your focus is balancing having enough Chi for spenders and using Blackout Kick just enough to prevent overcapping without using it too much and not having the Chi you need when a bigger spender becomes available.
- During major cooldowns, you will often have more Energy and Chi than you can use due to the GCD and cooldowns of Chi spenders, making avoiding the caps less impactful, but still something to be aware of.
- Keep Abilities on cooldown - With most of our Chi spenders having their own cooldowns, it is important to reduce the amount of time that these harder-hitting abilities are sitting off cooldown without being used. There will, inevitably, be overlaps where you'll have to choose what to press based on the priority list. A key part of playing Windwalker recognizing that one of these situations is approaching and trying to have enough Chi for what you need to do.
- React to procs - Windwalker has several procs that you'll need to manage in order to maximize damage potential. The main ones are Dance of Chi-Ji and Blackout Kick!. Both of these can stack to 2 so that you don't need to immediately use them. However, you will want to avoid risking overstacking, as that is lost damage potential. These procs can play an integral part in helping you balance your resources while still benefitting from Mastery: Combo Strikes. They can also throw off what you were planning, so being able to react intelligently and quickly is important.
- Do not break mastery. Simple as that, do not repeat the same ability twice in a row. For a full list of what counts for mastery, see here. There are currently no situations where it is worth it to break mastery as there have been in the past.
Following these rules is the largest part of playing Windwalker. You may notice that "always be casting" is not one of our core tenets, as you are only pressing something if it aligns with these rules (something comes off cooldown, you are close to capping energy, etc). This means that as a natural consequence of following these, you may not always fill every GCD. WINDWALKER IS A SPEC WITH NATURAL DOWNTIME. This is not an indication that you are playing incorrectly or that you need more Haste (which will not really affect this). To execute these rules in the most efficient way, follow the priorities below with the goal of never using something lower in the list if it will delay something higher in the list.
Cooldowns
As said above, the safest bet is to use things as close to their cooldown as possible. However, if you can use most cooldowns at the same time without losing a cast of them, you'll get the most out of them. You can read more about it in this article by Talby.
- Celestial Conduit
- Fortifying Brew
- Invoke Xuen
- Touch of Death
- Touch of Karma
- Zenith
Celestial Conduit is a powerful ability to use, but the most powerful aspect of it is that it adds the Heart of the Jade Serpent buff. However, because this buff can also come from using Strike of the Windlord or Whirling Dragon Punch, you need to stagger these uses for maximum benefit. This generally means using Celestial Conduit spaced out between casts of Strike of the Windlord or Whirling Dragon Punch. This attempts to insure maximum uptime and value.
The instance of Heart of the Jade Serpent that is triggered from using Zenith stacks with the version of Heart of the Jade Serpent that comes from Celestial Conduit, Strike of the Windlord, or Whirling Dragon Punch. However, the instance of Heart of the Jade Serpent that is generated from Celestial Conduit does not stack with the instance that comes from Strike of the Windlord or Whirling Dragon Punch.
This means that you can cast Zenith when you already have Heart of the Jade Serpent up, and you should because they stack very well. You want to try and avoid casting Celestial Conduit if you already have the buff that comes from Strike of the Windlord or Whirling Dragon Punch and visa versa.
Key takeaways are:
- Try to cast Zenith during Heart of the Jade Serpent.
- Try NOT to cast Celestial Conduit if you still have the Heart of the Jade Serpent buff from Strike of the Windlord or Whirling Dragon Punch.
- Try NOT to cast Strike of the Windlord or Whirling Dragon Punch if you have the Heart of the Jade Serpent buff from Celestial Conduit.
Fortifying Brew increases your maximum health, so it also increases the damage that Touch of Death deals and that Touch of Karma can absorb. Because of this, using Fortifying Brew before you use Touch of Death or Touch of Karma is a damage increase. This can be used to further improve your defense in a time of need, but it also has the secondary effect of increasing the amount of damage that is redirected back to the target.
If you are not going to need the defensive value of Fortifying Brew on its own, like if large damage intake is more frequent and you need to stagger your defensive cooldowns, then you can stack them together for added benefit. Just be sure to use Fortifying Brew BEFORE using Touch of Death or Touch of Karma as both snapshot on use.
A real good way to use this is to find a way to use Fortifying Brew then Touch of Karma at a time when you'll also be able to use Touch of Death during the duration of Fortifying Brew. This gets you both benefits for one use. If you're already going to use it for DPS purposes, then you might as well be efficient about it.
With the changes in Midnight Invoke Xuen, the White Tiger is mainly a button you press so that you can then channel Celestial Conduit afterwards. This means that you'll want to plan ahead slightly so that you are not wasting a GCD summoning Xuen when you want to be dealing damage.
There is a large window after casting Invoke Xuen, the White Tiger where you're able to cast Celestial Conduit. Because balancing the above Heart of the Jade Serpent buff generally means a somewhat strict sequence of abilities, you will want to avoid deviating much from the above opener, even if it's the middle of a fight.
Touch of Death seems like a straightforward ability to use but attempting to min/max it can lead to losing damage rather than gaining it. With the change to Fatal Touch in Midnight, it no longer provides a damage increase after using it.
While this generally means that you'll want to use it as soon as its available and you have space to press it without delaying another ability, it also means that you CAN try to use it right before the target dies when your target has less health than your maximum health so that it deals 100% of your health rather than just the 35% of your maximum health that it deals if you use it on a target that is at 15% health or lower.
This is a very small window and Touch of Death can sometimes have a delay before being usable if you just swap to a target to try and hit it with Touch of Death. This delay can be the difference between making or missing the very small window. Missing the window generally means that you don't get Touch of Death off and thus lose damage that you would have done if you had cast it sooner.
In Mythic+ trash you generally want to use this ASAP as the window to do so may be small. On bosses in Raid and Mythic+ you typically have a longer window to use it, so you want to prioritize other abilities with shorter cooldowns like Fists of Fury as long as you cast Touch of Death before the fight is over.
Touch of Karma is, first and foremost, a defensive ability. Its primary use is to absorb some damage in order to lessen the damage that you are dealt. However, the secondary function of Touch of Karma is that some of the damage that the shield absorbs is redirected back to the target that you cast the spell on. This means that Touch of Karma can be used offensively if you do not need its defensive value.
Most fights in most content have times where you will be taking damage and can cleanly use Touch of Karma for both its defensive and offensive value. However, sometimes the damage you are taking isn't enough to necessitate a defensive cooldown like Touch of Karma. In these situations it is, technically, optimal to find some damage that you can then absorb and redirect. This can be done through standing in some damage effect on the ground, or in extreme situations, casting Provoke on a target and taking a few smacks.
Needing to Provoke a target to get the benefit from Touch of Karma should be used as a last resort and only ever be done with the express permission of your tanks and healers as you're often likely to get killed once the shield ends without direct intervention. Do this at your own risk.
Zenith doesn't provide any direct damage increase without the addition of additional talents like the Apex Talents of Tigereye Brew. However, it does reduce the cost of all of your Chi spenders by 1 and increases the cooldown reduction provided by Blackout Kick by an additional second. When you press the button it resets the cooldown of Rising Sun Kick and provides you an additional 2 Chi to use right away.
Key takeaways are:
- While Zenith is active, Blackout Kick becomes free, so it is your primary filler in order to get Rising Sun Kick and Fists of Fury back from cooldown as quickly as possible.
- This also means that you can very quickly feel like you have too much Chi if you're also using Tiger Palm too often.
- Due to getting your cooldowns back faster, it is even more important to have the Chi that you need to cast them right away.
- If talented into Obsidian Spiral then Blackout Kick generates a Chi rather than consuming one. This causes it to function as both your primary filler and primary Chi-builder.
- Tiger Palm can be used in between Blackout Kicks to add a stack of Teachings of the Monastery for the ensuing Blackout Kick. This can result in overcapping your Chi at times, but this is preferable to casting nothing.
- Zenith has two stacks, so you do not need to use it as soon as it is available but can plan its use for the best possible time.
- Through talents, Zenith can have a cooldown that takes 60, 70, 80, or 90-seconds to return. With two possible stacks, this means you can safely use it based on when you get the most value out of it, during a high-damage phase of a fight, a time with many targets to hit, or during large buffs like Bloodlust or with your trinkets.
Priority Lists
The lists below assume you are doing what you need to do to avoid capping resources, avoid breaking your mastery, and using above cooldowns appropriately. Right now Heart of the Jade Serpent doesn't require its own priority, but that may change in the future. We've included a "simplified" version of each priority if the "detailed" one is a bit much.
Single Target Priority
NOTES: Skip steps that don't apply to your Talent build. Those priorities are meant to be used by people regardless of their build, and will include some steps that don't apply to the recommended builds.
- Default SP
- Default Conduit
- Advanced Shado-Pan
- Advanced Conduit
- Cast Whirling Dragon Punch
- Cast Zenith Stomp if low on Chi or Zenith is almost over
- Cast Tiger Palm to avoid capping energy outside of Zenith and Bloodlust or if not enough Chi to cast Fists of Fury
- Cast Fists of Fury
- Cast Rushing Wind Kick
- Cast Spinning Crane Kick with Dance of Chi-Ji and with an active Unbroken Rhythm buff
- Cast Rising Sun Kick
- Cast Blackout Kick with Combo Breaker OR during Zenith and talented into Obsidian Spiral
- Cast Spinning Crane Kick during Zenith AND either more than 4 Chi OR Dance of Chi-Ji
- Cast Tiger Palm if less than 2 Chi
- Cast Spinning Crane Kick with Dance of Chi-Ji
- Cast Tiger Palm without overcapping Chi
- Cast Blackout Kick
Losing Combo Breaker or Dance of Chi-Ji procs by overcapping or their buffs running out should be avoided by using their respective ability with a slightly higher priority than the list shows. Don't overthink that too hard.
- Cast Whirling Dragon Punch if your next Invoke Xuen, the White Tiger will not happen within the next 10 seconds
- Cast Celestial Conduit if no active Heart of the Jade Serpent from Whirling Dragon Punch/Strike of the Windlord
- Cast Zenith Stomp if low on Chi or Zenith is almost over or inside Celestial Conduits channel
- Cast Fists of Fury if Heart of the Jade Serpent lasts less than 1 second
- Cast Tiger Palm to avoid capping energy outside of Zenith and Bloodlust OR if not enough Chi to cast Fists of Fury
- Cast Fists of Fury
- Cast Rushing Wind Kick
- Cast Spinning Crane Kick with an active Unbroken Rhythm buff
- Cast Rising Sun Kick
- Cast Blackout Kick with Combo Breaker OR during Zenith and talented into Obsidian Spiral
- Cast Spinning Crane Kick during Zenith AND either more than 4 Chi OR Dance of Chi-Ji
- Cast Tiger Palm if less than 2 Chi
- Cast Spinning Crane Kick with Dance of Chi-Ji
- Cast Tiger Palm without overcapping Chi
- Cast Blackout Kick
Losing Combo Breaker or Dance of Chi-Ji procs by overcapping or their buffs running out should be avoided by using their respective ability with a slightly higher priority than the list shows. Don't overthink that too hard.
- Cast Whirling Dragon Punch during its grace period
- Cast Zenith Stomp if low on Chi or Zenith is almost over
- Cast Tiger Palm to avoid capping energy outside of Zenith and Bloodlust
- Cast Fists of Fury
- Cast Whirling Dragon Punch
- Cast Strike of the Windlord
- Cast Tiger Palm if not enough Chi to cast Fists of Fury
- Cast Rushing Wind Kick
- Cast Spinning Crane Kick with Dance of Chi-Ji and with an active Unbroken Rhythm buff
- Cast Rising Sun Kick
- Cast Blackout Kick with 2x stacks of Combo Breaker
- Cast Blackout Kick during Zenith with Combo Breaker OR talented into Obsidian Spiral
- Cast Spinning Crane Kick during Zenith AND either more than 4 Chi OR Dance of Chi-Ji
- Cast Touch of Death
- Cast Tiger Palm if less than 2 Chi
- Cast Blackout Kick with Combo Breaker
- Cast Spinning Crane Kick with Dance of Chi-Ji
- Cast Slicing Winds
- Cast Tiger Palm without overcapping Chi
- Cast Blackout Kick
- Cast Whirling Dragon Punch during its grace period AND the cooldown of Invoke Xuen, the White Tiger is longer than 10 seconds
- Cast Zenith Stomp if low on Chi or Zenith is almost over or inside Celestial Conduits channel
- Cast Fists of Fury if Heart of the Jade Serpent lasts less than 1 second
- Cast Tiger Palm to avoid capping energy outside of Zenith and Bloodlust
- Cast Fists of Fury
- Cast Whirling Dragon Punch if the cooldown of Invoke Xuen, the White Tiger is longer than 10 seconds
- Cast Strike of the Windlord if the cooldown of Invoke Xuen, the White Tiger is longer than 10 seconds
- Cast Celestial Conduit if no active Heart of the Jade Serpent from Whirling Dragon Punch/Strike of the Windlord
- Cast Tiger Palm if not enough Chi to cast Fists of Fury
- Cast Rushing Wind Kick
- Cast Spinning Crane Kick with Dance of Chi-Ji and with an active Unbroken Rhythm buff
- Cast Rising Sun Kick during Bloodlust AND without Dance of Chi-Ji
- Cast Spinning Crane Kick with Season 2 4-piece bonus, Unbroken Rhythm
- Cast Rising Sun Kick
- Cast Blackout Kick with 2x stacks of Combo Breaker
- Cast Blackout Kick during Zenith with Combo Breaker OR talented into Obsidian Spiral
- Cast Spinning Crane Kick during Zenith AND either more than 4 Chi OR Dance of Chi-Ji
- Cast Touch of Death
- Cast Tiger Palm if less than 2 Chi
- Cast Blackout Kick with Combo Breaker
- Cast Spinning Crane Kick with Dance of Chi-Ji
- Cast Slicing Winds
- Cast Tiger Palm without overcapping Chi
- Cast Blackout Kick
AOE Priority (Generally 2 or more targets)
NOTES: Skip steps that don't apply to your Talent build. Those priorities are meant to be used by people regardless of their build, and will include some steps that don't apply to the recommended builds.
- Shado-Pan
- Conduit of the Celestials
- Cast Whirling Dragon Punch
- Cast Strike of the Windlord
- Cast Zenith Stomp if low on Chi or Zenith is almost over
- Cast Tiger Palm if missing the Chi to cast Fists of Fury
- Cast Fists of Fury
- Cast Spinning Crane Kick with Season 2 4-piece bonus, Unbroken Rhythm
- Cast Tiger Palm to avoid capping Energy outside of Zenith
- Cast Rising Sun Kick to enable Whirling Dragon Punch
- Cast Rushing Wind Kick without Season 2 4-piece bonus, Unbroken Rhythm
- Cast Spinning Crane Kick during Zenith with at least 5 targets
- Cast Rising Sun Kick with either Bloodlust or Zenith but without Season 2 4-piece bonus, Unbroken Rhythm
- Cast Blackout Kick with Obsidian Spiral talented AND Zenith active AND Rising Sun Kick on cooldown
- Cast Spinning Crane Kick
- Cast Slicing Winds
- Cast Blackout Kick with Combo Breaker
- Cast Tiger Palm with less than 5 Chi AND no Zenith active
- Cast Blackout Kick with Shadowboxing Treads talented
- Cast Rising Sun Kick
- Cast Blackout Kick
- Cast Fists of Fury if Heart of the Jade Serpent is about to end
- Cast Whirling Dragon Punch if Invoke Xuen, the White Tiger cooldown is longer than 10 seconds
- Cast Strike of the Windlord if Invoke Xuen, the White Tiger cooldown is longer than 10 seconds
- Cast Zenith Stomp if low on Chi or Zenith is almost over
- Cast Tiger Palm if missing the Chi to cast Fists of Fury
- Cast Fists of Fury
- Cast Spinning Crane Kick with Season 2 4-piece bonus, Unbroken Rhythm
- Cast Tiger Palm to avoid capping Energy outside of Zenith
- Cast Rising Sun Kick to enable Whirling Dragon Punch
- Cast Rushing Wind Kick without Season 2 4-piece bonus, Unbroken Rhythm
- Cast Rising Sun Kick with Heart of the Jade Serpent active and NO with Season 2 4-piece bonus, Unbroken Rhythm
- Cast Spinning Crane Kick during Zenith with at least 5 targets
- Cast Rising Sun Kick with either Bloodlust or Zenith but without Season 2 4-piece bonus, Unbroken Rhythm
- Cast Blackout Kick with Obsidian Spiral talented AND Zenith active AND Rising Sun Kick on cooldown
- Cast Spinning Crane Kick
- Cast Slicing Winds
- Cast Blackout Kick with Combo Breaker
- Cast Tiger Palm with less than 5 Chi AND no Zenith active
- Cast Blackout Kick with Shadowboxing Treads talented
- Cast Rising Sun Kick
- Cast Blackout Kick
Openers
Use these ability orders to start pulls, these may change frequently over time. If you are starting a pull with more Chi, such as in M+, then simply skip the steps that get you to the necessary Chi level. See the Trinkets section further down for how on use trinkets may change your opener.
NOTES: Skip steps that don't apply to your Talent build. Those openers are meant to be used by people regardless of their build, and will include some steps that don't apply to the recommended builds.
- Shado-Pan
- Conduit of the Celestials
- Cast Tiger Palm
- Use Potion of Recklessness (if Algeth'ar Puzzle Box equipped and your sim tells you its the better potion)
- Use Algeth'ar Puzzle Box (if equipped)
- Cast Zenith with potions, racials and trinkets (make sure to use stat buffs prior Zenith is cast to buff Zenith Stomp)
- Cast Strike of the Windlord (if talented)
- Cast Fists of Fury
- Cast Rising Sun Kick
- Cast Fists of Fury (if #7 did reset your Fists of Fury cooldown)
- Cast Whirling Dragon Punch (if talented and #7 did not reset your Fists of Fury cooldown)
- Continue with normal priority
Notes: Ideally, you want to repeat the steps 4 and onwards every time Invoke Xuen, the White Tiger and Celestial Conduit will be ready. Keep one charge of Zenith ready for this window and delay Strike of the Windlord and Fists of Fury if necessary.
- Use Algeth'ar Puzzle Box pre combat (if equipped)
- Cast Tiger Palm
- Cast Invoke Xuen, the White Tiger
- Cast Zenith with potions, racials and trinkets (make sure to use stat buffs prior Zenith is cast to buff Zenith Stomp)
- Cast Strike of the Windlord (if talented)
- Cast Fists of Fury
- Cast Rising Sun Kick
- Cast Fists of Fury (if #7 reset your Fists of Fury cooldown)
- Cast Whirling Dragon Punch (if talented and #7 did not reset your Fists of Fury cooldown)
- Continue with normal priority
Make sure to not cast your Celestial Conduit too early so you dont overlap your Heart of the Jade Serpent windows from Strike of the Windlord/Whirling Dragon Punch with the Heart of the Jade Serpent window from Celestial Conduit. Delaying it that much is not an issue since the plan is to send a second charge of Zenith right after the first one in your opener.
Ability Usage Notes
- Blackout Kick – Generally used between other abilities to "dump" excess resources.
- Teachings of the Monastery – Has currently no impact on the priority. May be relevant in another patch again.
- Blackout Kick! (Free Proc) – Used before you would potentially overcap on procs (you can hold 2 at a time).
- Crackling Jade Lightning – Not used anymore.
- Dance of Chi-Ji – Simply use the proc on Spinning Crane Kick (according to priority, and even in single target) and spend it quickly enough to avoid overcapping on procs (you can hold 2 at a time).
- Hit Combo and Mastery – Generally, any ability that directly deals damage both benefits from and continues Mastery and Hit Combo, as well as a few that don't directly deal damage. For a full list, see here. Currently, there are no cases where we want to break Mastery that would outweigh its damage bonus.
- Heart of the Jade Serpent – This is a buff that is applied by various abilities when running Conduit of the Celestials. It reduces the cooldown of several rotational abilities, and greatly increases the channeling speed of Fists of Fury. The buff is applied by Strike of the Windlord or Whirling Dragon Punch after first unlocking the hero talent, but also after unlocking Unity Within, a more powerful version is also applied by Celestial Conduit (as one of the "assists" of the Celestials). These two versions do not stack with each other. An additional version of the buff comes from Zenith. This version does stack with the other two.
- Rising Sun Kick then Whirling Dragon Punch – This term is used to describe the Rising Sun Kick that enables the Whirling Dragon Punch and the Whirling Dragon Punch itself. This line, when used, does not apply to Rising Sun Kick unless Whirling Dragon Punch will be used before Rising Sun Kick will be ready again. However, they don't have to be cast in direct succession.
- Spinning Crane Kick – It is finally possible again to cast abilities when Spinning Crane Kick's global has passed and before its channel has finished. This applies to any ability that has no cast or channel time. Vivify buffed by Viviacious Vivification will still interrupt Spinning Crane Kick.
- Strike of the Windlord & Whirling Dragon Punch – Usage depends on the current build.
- Shado-Pan builds use Strike of the Windlord and Whirling Dragon Punch on cooldown unless a damage amplifier is in the near future or you plan on using Zenith soon. (3 seconds at max)
- Conduit of the Celestial builds rely a lot on stacking Heart of the Jade Serpent windows. Holding Strike of the Windlord and Whirling Dragon Punch is not recommended unless you have a damage amplifier starting within the next few seconds. It should generally be followed by casting Zenith to overlap their Heart of the Jade Serpent windows to multiply the effects. Additionally, a proper big burst window is crucial for Conduit of the Celestial builds. Delaying Strike of the Windlord or Whirling Dragon Punch is recommended when the next big burst window with Invoke Xuen, the White Tiger and Celestial Conduit will start within the next 10 seconds. You will instead delay Invoke Xuen, the White Tiger if it comes off cooldown while Strike of the Windlord or Whirling Dragon Punch will come off cooldown in the next 10 seconds.
- Zenith Stomp – This appears during Zenith and has two charges to use and you want to use both charges before Zenith runs out. It can be cast during Celestial Conduit without stopping its channel. You generally want to use it after any ability with a cooldown, and before "spammable" abilities like Blackout Kick. The precise place in the priority can be found in that part of the guide.
Gearing
Stats
General stat priority for each Windwalker Hero tree.
Agility > Haste = Critical Strike = Mastery >>> Versatility
Stat priorities can and will change for your character depending on your current gear, stats and talents. Stat weights are largely an outdated thought. Sim the gear you have through Top Gear. If you're looking for what gear to aim for, use Droptimizer.
Crafting
Generally, we recommend simulating your character through Top Gear to find what piece is best for you. For everything else, here is a flowchart.

Weapons and 1H vs 2H
2H is better.
For specific situations or item level gaps, sim your character's options with Raidbot’s Top Gear Tool.
Trinkets
Ideally you want Voracious Heart of Ula'tek and Zul'jin's Guillotine Technique. As always, sim your options to see what's best for you in particular.
Honorable Mentions:
- There are several strong passive trinkets that can also be considered; Keeper's Seething Core, Twisted Horror's Tendril, and Gebbo's Bottomless Bag.
"Best-in-Slot"
Sim the gear you have through Top Gear. If you're looking for what gear to aim for, use Droptimizer.
Gems/Enchants
Gems
Use Raidbot’s Top Gear Toolfor the most specific and accurate results for your character. In general, it will usually follow the stat priority above.
Enchants
- Weapon – Best to sim for your character through Top Gear. Default: Enchant Weapon - Rite of the Hash'ey
- Helm – Enchant Helm - Empowered Rune of Avoidance
- Shoulders – Enchant Shoulders - Amirdrassil's Grace
- Cloak – Enchant Cloak - Chant of Winged Grace (No new enchant for Midnight)
- Chest – Enchant Chest - Mark of the Worldsoul
- Bracers – Enchant Bracer - Chant of Armored Avoidance (No new enchant for Midnight)
- Boots – Enchant Boots - Lynx's Dexterity
- Ring – Best to sim for your character through Top Gear. Default: Enchant Ring - Eyes of the Eagle
- Armor Kit – Forest Hunter's Armor Kit (functionally an enchant)
Venomcores
Bonus Rolls
Best explained in a flowchart:

Gear Upgrades
Weapon > On-Use Trinket > Passive Trinket > Necklace
Miscellaneous
Consumables
- Flask – Flask of the Blood Knights. Any of the Flasks that give Haste, Critical Strike, or Mastery will be viable options, just be sure that your sims are using the one you want and it will adjust your gems and enchants if needed.
- Potion – Potion of Recklessness and Light's Potential are about equal, based on your gear and talents one of them can be slightly ahead of the other. Sim to make sure you are using the correct one.
- Food – Harandar Celebration or Silvermoon Parade
- Weapon Enhancement – Thalassian Phoenix Oil
Racials
Currently, all races sim within a small range of each other and reshuffle constantly. Other than that, pick whatever race you prefer.
Using the racial available to you depends highly on the exact racial. In general, they are divided into three different groups. Buff racials, direct damage racials and special racials.
Buff racials are the following racials:
- Ancestral Call (Mag'har Orc)
- Berserking (Troll)
- Blood Fury (Orc)
- Fireblood (Dark Iron Dwarf)
Those are used with your cooldowns and can be put into a Burst Macro like the macro you can find in the macro section. Direct damage racials are the following racials:
- Arcane Pulse (Nightborne)
- Azerite Surge (Earthen)
- Bag of Tricks (Vulpera)
- Haymaker (Kul Tiran)
- Light's Judgment (Lightforged Draenei)
- Rocket Barrage (Goblin)
- Thorn Bloom (Haranir)
Those are very undertuned and are used at the very end of the priority or whenever you are unable to cast something else. The only special racial existing right now is the Blood Elf racial Arcane Torrent. This can be used whenever you need a quick chi for your big spenders and you are not able to press a tiger palm for it.
Professions
Professions have no bearing on your ability to perform your role. Pick whatever will make your playing time easier and more enjoyable. As a starting point, many players take Engineering and/or Alchemy for some small perks.
Macros
Don't Clip Things
#showtooltip Tiger Palm
/stopmacro [channeling:Fists of Fury]
/cast Tiger Palm
OR
#showtooltip Tiger Palm
/cast [nochanneling:Fists of Fury]Tiger Palm
Change Tiger Palm to whatever ability you want. This macro prevents you from cancelling the channel of Fists of Fury. With 12.1 cancelling Celestial Conduit is now a thing which makes us return to the old format of using a single stopmacro line rather than conditionals that prevent your cast from being executed during specific channels. It is recommended to use this on your main rotational abilities as it's very very unlikely that we'll look to cancel these abilities.
Here is a version of the Don't Clip Things Macro that swaps between Whirling Dragon Punch and Strike of the Windlord depending on what you have talented.
#showtooltip [known:392983] Strike of the Windlord; Whirling Dragon Punch
/stopmacro [channeling:Fists of Fury]
/cast [known:152175] Whirling Dragon Punch
/cast [known:392983] Strike of the Windlord
Fists of Fury and Unity Within
#showtooltip Fists of Fury
/cast Unity Within
/cast Fists of Fury
This macro is required due to a slight issue with the execution of things in the game. If you cancel your Celestial Conduit with a Fists of Fury the end of channel happens at the exact time the new channel is started resulting in the application of your Heart of the Jade Serpent window that you get from Unity Within happening after your Fists of Fury channel has already snapshot the duration of the channel. Unity Within is affected by your global cooldown while it doesnt cause one itself. This behaviour requires you to use this macro right after the current global cooldown has finished to execute Unity Within properly in time for Fists of Fury to snapshot the duration of the channel properly. There is sadly no other solution for this at the current point.
Zenith Stomp and Tiger Palm
#showtooltip
/cast Zenith Stomp
/cast Tiger Palm
This macro layers Zenith Stomp on top of Tiger Palm so you can treat Zenith Stomp as a glorified Tiger Palm. It abuses the fact that you unlearn Zenith Stomp as ability once either Zenith Stomp stacks are consumed or Zenith ends. It can bug out if you enter any loading screen while you still have stacks remaining so pay attention to that. If you want to add the Don't Clip conditionals feel free to do so.
Burst Macro
#showtooltip Zenith
/use [pet][known:450615]13
/use [mod:shift,pet][mod:shift,known:450615]item:212971
/use [mod:shift,pet][mod:shift,known:450615]item:212265
/cast Zenith
This Macro uses your on-use stat trinket and potions in the correct order to allow your Zenith Stomp from casting Zenith to be affected by the stat buffs as well. However, this macro has a few nuances you need to adjust for your personal use, so here is an explanation for all lines and how to change them appropriately. /use [pet][known:450615]13This line uses your trinket in slot 13 whenever you have an active pet OR when you are talented into Shado-Pan by utilizing the very first passive point Flurry Strikes. For Windwalker the only active pet that triggers this condition is a summoned Xuen from Invoke Xuen, the White Tiger by talenting into Conduit of the Celestials. If you have your on-use stat trinket on slot 14 you need to adjust this line. If you don't use a trinket that should be used that close between Xuen and Zenith or don't have one (example for the first would be a trinket like Algeth'ar Puzzle Box) you should delete this line to make sure you don't accidentally misuse the trinket you have. /use [mod:shift,pet][mod:shift,known:450615]item:212971 /use [mod:shift,pet][mod:shift,known:450615]item:212265 Those two lines allow you to use less binds by using a shift modifier to pop your potion at the same time as your trinket, right before your Zenith Stomp from casting Zenith. The used IDs are the Fleeting Tempered Potion and the normal Tempered Potion, both at rank 3. By using this order given in the macro, you will first use your existing Fleeting Potions before starting to use your personal property. If you use rank 2 or even rank 1 potions, you can add those lines by using the same format with the IDs you can find on wowhead. If you want to use different modifiers, you can also replace shift by ctrl or alt or even get rid of it fully. Just be aware that you may end up consuming all your precious potions in content you may not want to use them for if you remove the modifier condition. /cast ZenithSimply casts Zenith as the very last thing inside this macro.
Seperating Invoke Xuen, the White Tiger and Celestial Conduit
When you want to seperate Invoke Xuen, the White Tiger and Celestial Conduit as seperate keybinds, just because you are used to it from your time in The War Within you can use the following two macros. This is for Xuen:
#showtooltip
/cast [nopet]Invoke Xuen, the White Tiger
And this is for Celestial Conduit
#showtooltip Celestial Conduit
/cast [pet]Celestial Conduit
If you want their icons to properly show you have to hard assign the icon through the pre selection of the icon yourself.
Focus Cast Macros
Windwalker has a number of spells you may want to target using the /Focus targetting option. You can replace the sample textin the macro below with spells such as Spear Hand Strike, Paralysis, or Detox depending on your preference:
#showtooltip
/cast [@focus,exists] Sample Text
Mouseover Macros
In some cases being able to cast spells/heals on targets without having to switch targets is extremely useful. You can use the following macro to make the desired spell cast on the target you are currently mousing over instead of your active target. Replace the sample text with the desired spell name:
#showtooltip
/cast [@mouseover] Sample Text
Ring of Peace Placement
The following two macros will place Ring of Peace without having to use a targeting circle to do so The first will place if at your feet when pressed immediately:
#showtooltip
/cast [@player] Ring of Peace
And this will place it where your cursor is currently targeting:
#showtooltip
/cast [@cursor] Ring of Peace
Changelog
- Aug 10, 2026 - Updated for Patch 12.1
- March 5, 2026 - Adjusted Talentbuilds, Priorities and Openers.